- Premiere Tutotial
Time Remapping in Premiere Pro: How to Make a Timelapse and Slow Motion Video
Jan 04,2019• Proven solutions
It is possible to make timelapse or slow motion videos by using Adobe Premiere Pro. And you can accomplish this task with ease and the end results will always be clear with professional like appearance. The article below will help you to learn few tricks about how to do time remapping in Adobe Premiere Pro.
This is a basic tutorial about Adobe Premiere, professional video editing software. However, if video editing is new to you, consider Wondershare Filmora, which is a powerful but easy-to-use tool for users just starting out. Download the free trial version below.
Here are few reasons for choosing Wondershare Filmora as Adobe Premiere Pro alternative:
- It offers supports to wide range of file formats like MTS, MKV, MOV, FLV, MP4, AVI and WMV etc. So users can execute any editing operation without wasting time on format conversion.
- Filmora is designed with user friendly interface where beginners can do all operations with ease. The drag and drop facility along with unique set of video effects make it most suitable for your routine needs.
- This software tool contains all advanced video editing features like brightness adjustments, saturation, contrast and other video adjustment tools.
- There are numbers of special video effects like face off, jump cut, tilt soft, transitions, title templates and PIP effects.
How to make a timelapse and slow motion video in Adobe Premiere Pro
- Method 1: Using Time Remapping
- Method 2: Using Speed/Duration Command
- Method 3: Using Rate Stretch Tool
Method 1: Using Time Remapping:
Time Remapping is a powerful editing tool of Premiere Pro software platform as it provides complete control to editor for making adjustments of clip timings. Using this advanced feature, users can freely define time for different layers at specific playback positions.
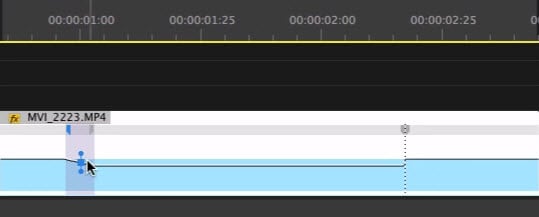
Step 1: First of all, bring your video clip to timeline and then right click over it. From drop down menu select “Show Clip Keyframes”. One more list of options will appear out of which you have to select 'Time Remapping'. Finally hit the speed option.

Step 2: Now you have to adjust speed of your video up to desired level. To do this, simply drag 'Rubber Band' available on screen, it will help you to increase and decrease clip duration. Window users can try Control+Click command to do so and for Mac users Command+Click will do the same operation.
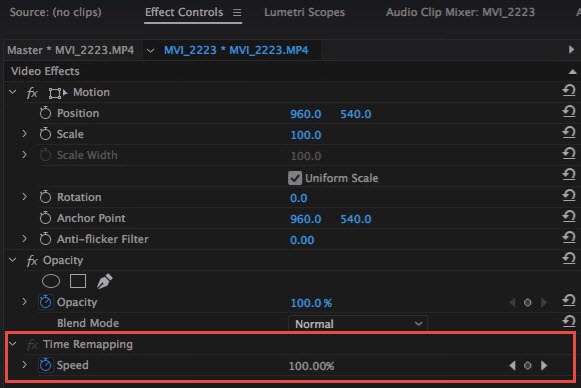
Step 3: Users can also time remap their frames from effects panel.

Check the video tutorial below to know more:
Method 2: Using Speed/Duration Command:
Note that: duration of a video represents its measurement from starting point to ending point whereas speed deals with the rate of playbacks for particular clip and its value is generally displayed in terms of percentage. Note that, speed has direct relation with playbacks whereas duration has to deal with the time period for which one clip will stay on timeline.
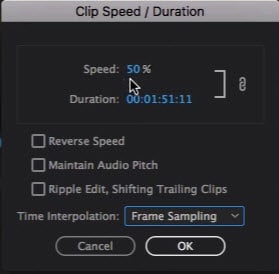
Step 1: First of all you have to Right Click on your clip that is already imported to Premiere Pro timeline. From drop down menu, navigate to Speed/Duration option.

Step 2: Now choose your desired command
Step 3: Hit Ok.
There are so many easy to implement parameters under Speed/Duration command. Whenever a video clip gets linked to speed/duration command then its speed percentage is reflected on screen. If its value is less than 100% then it will naturally slowdown the playback and duration will automatically get increased by proportionate amount whereas if percentage rating is to the higher side of 100% then it will speed up the clip with reduction in its overall time duration.

Users can easily link or unlink the speed/duration option by hitting the dedicated icon available on viewer screen. The clip play back can be easily reversed using reverse speed option. Further, it can also help you to adjust audio effects from “maintain audio pitch” option so that it appears good even during speeded up playbacks.
Method 3: Using Rate Stretch Tool:
The rate stretch tool in Adobe Premiere Pro helps to male direct settings for clip duration with respect to speed. Both of these will go side by side as you try to adjust one, another one will vary equally and will try to compensate video standard. This tool is commonly used by cinematographers to enjoy cool clip adjustments. It helps them to add special effects in certain portions of movies so that it can grab major attention from audience.
Step 1: First of all you have to select the rate stretch button from Premiere Pro window. This option can be directly enabled by hitting 'R' button.

Step 2: Hit the in-point/out-point option and drag it on your video clip.

The great thing about Premiere Pro is that it helps to match all your duration and speed adjustments to standard level automatically. So everything is just simple to execute.
Bring up your video to a professional level with straightforward tools.
Try It Free Try It Free


Liza Brown
chief Editor
0 Comment(s)